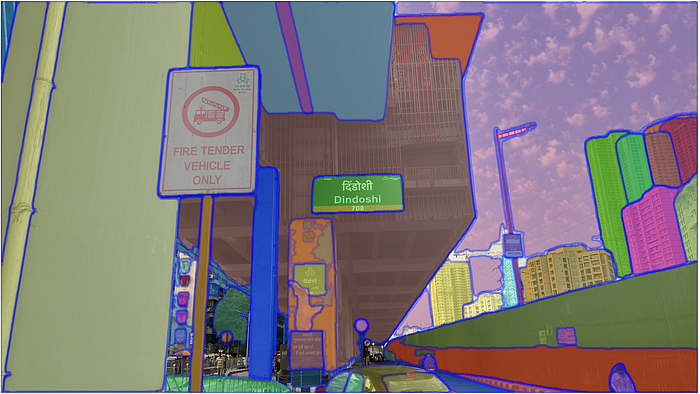
Segment Anything model (SAM) Keypoints:
- The largest segmentation dataset to date (by far), with over 1 billion masks on 11M licensed and privacy-respecting images.
- Promptable segmentation
- SAM to return a valid segmentation mask for any prompt, where a prompt can be foreground/background points, a rough box or mask, freeform text, or, in general, any information indicating what to segment in an image.
The code requires python>=3.8, as well as pytorch>=1.7 and torchvision>=0.8.
Step-1 Create the command to install PyTorch with CUDA
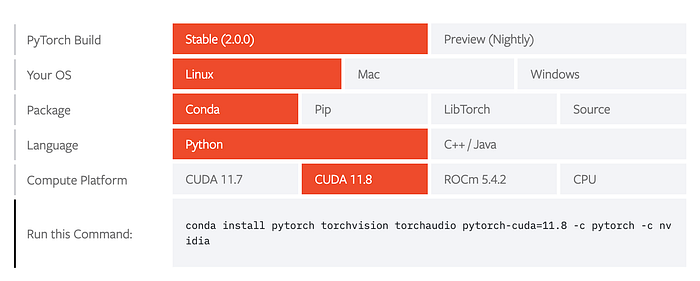
Go to this website and select your preferences.
Do not hurry to run the install command.
Bring your attention to the CUDA version. In the below image, you can see that the runtime CUDA API version required to install the PyTorch with CUDA is 11.8.
The next step is to verify if our machine also has 11.8 CUDA installed or not.
Step-2 Check the CUDA runtime version
To check the CUDA runtime version in Linux, you can use the following command in your terminal:
nvcc --version
CUDA has two primary APIs: the runtime API and the driver API.
nvcc --version reports the version of the runtime CUDA compiler version, which is part of the CUDA toolkit. This is the version that we will use to compile and run CUDA programs.

To satisfy the above requirement we must upgrade our runtime CUDA version from 10.0 to 11.8.
Step-3 Upgrade the CUDA runtime version
- Use this link to create your configuration to install or upgrade the correct version of CUDA
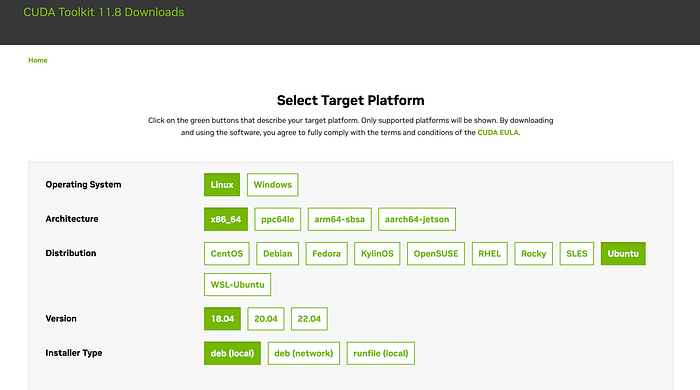
After you have selected your combinations correctly the below set of commands will get generated for your system. Run them one by one and you will be very easily able to upgrade your CUDA version.
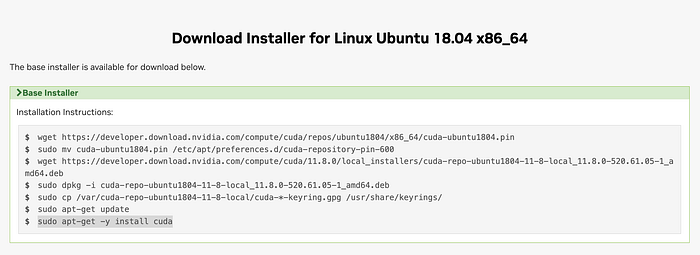
After upgrading your CUDA, run the below command to verify.

Next, use the below command to add the new CUDA version to your PATH.
2. Create a new file:
sudo vim /etc/profile.d/cuda.sh
Inside this file type the below command and save the file.
export PATH=/usr/local/cuda-11.8/bin:$PATH
export CUDADIR=/usr/local/cuda-11.8

Now run the below command to give permission to this file.
sudo chmod +x /etc/profile.d/cuda.sh
3. Create another file with the below command
sudo vim /etc/ld.so.conf.d/cuda.conf
Write the below text in the file:
/usr/local/cuda-11.8/lib64

4. Run the below command and restart your machine!
sudo ldconfig
export LD_LIBRARY_PATH=$LD_LIBRARY_PATH:/usr/local/cuda-11.8/lib64
export LD_LIBRARY_PATH=/usr/local/cuda-11.8/lib64:$LD_LIBRARY_PATH
Next, when you try to check the CUDA Driver Version by using the command ‘nvidia-smi’, you may get an error of CUDA version mismatch.
What you need to do is. Restart your machine and then everything will be fine.

Step -2 Create Anaconda Virtual environment
conda create --name sam_gpu python=3.10
conda activate sam_gpu

Step -3 Clone the official repository of segment-anything
Git clone the official repository using the below command:
git clone https://github.com/facebookresearch/segment-anything.git

cd segment-anything; pip install -e .
pip install opencv-python pycocotools matplotlib
pip install onnxruntime onnx
Step-4 Install PyTorch
Now let us run the below command to install PyTorch smoothly.
conda install pytorch torchvision torchaudio pytorch-cuda=11.8 -c pytorch -c nvidia
Run the above command when you are sure the CUDA version is 11.8.
The installation of the above libraries will take a good 20 minutes. So one must have patience. You can gulp down a glass of water meanwhile to allow some time for the above code to finish.

Step-5 Download Model Checkpoints
The author says that running on CUDA and using the default model are recommended for the best results.
Let us now download the model from here.
I have downloaded default or vit_h: ViT-H SAM model.
You will have to transfer the weight file to the remote machine if you have downloaded the weights on your local machine. You can use the ‘scp’ command to transfer the weight file.
scp -i "/Users/pemfile/aws_dl.pem" -r /Users/Downloads/sam_vit_h_4b8939.pth ubuntu@ec2-82-3-95-242.compute-1.amazonaws.com:/home/ubuntu/pallawi/metaai/segment-anything/
Step-6 Create a Python file inside the folder “segment-anything”
The machine I have used to do the inference is a g4dn.xlarge.
Necessary imports and helper functions for displaying points, boxes, and masks.
import cv2
import torch
import numpy as np
import matplotlib.pyplot as plt
import numpy as np
from segment_anything import SamPredictor, sam_model_registry
Test if your GPU is visible to PyTorch.
device = torch.device("cuda" if torch.cuda.is_available() else "cpu")
print(device)
First, load the SAM model and predictor. Change the path below to point to the SAM checkpoint. Running on CUDA and using the default model are recommended for the best results.
model_type = "vit_h"
sam = sam_model_registry[model_type](checkpoint="/home/ubuntu/pallawi/metaai/segment-anything/sam_vit_h_4b8939.pth")
sam.to(device=device)
predictor = SamPredictor(sam)
Run the below command to download the input test image, which is an image of a Truck.
mkdir images
wget -P images https://raw.githubusercontent.com/facebookresearch/segment-anything/main/notebooks/images/truck.jpg
To select the truck, choose a point on it. Points are input to the model in (x,y) format and come with labels 1 (foreground point) or 0 (background point). Multiple points can be input; here we use only one. The chosen point will be shown as a star on the image.
image = cv2.imread('/home/ubuntu/pallawi/metaai/segment-anything/images/truck.jpg')
image = cv2.cvtColor(image, cv2.COLOR_BGR2RGB)
predictor.set_image(image)
input_point = np.array([[500, 375]])#truck.jpg promt point
input_label = np.array([1])
With multimask_output=True (the default setting), SAM outputs 3 masks, where scores gives the model's own estimation of the quality of these masks. This setting is intended for ambiguous input prompts and helps the model disambiguate different objects consistent with the prompt. When False, it will return a single mask. For ambiguous prompts such as a single point, it is recommended to use multimask_output=True even if only a single mask is desired; the best single mask can be chosen by picking the one with the highest score returned in scores. This will often result in a better mask.
masks, scores, logits = predictor.predict(
    point_coords=input_point,
    point_labels=input_label,
    multimask_output=True,
)
print(masks.shape)
def show_mask(mask, ax, random_color=False):
    if random_color:
        color = np.concatenate([np.random.random(3), np.array([0.6])], axis=0)
    else:
        color = np.array([30/255, 144/255, 255/255, 0.6])
    h, w = mask.shape[-2:]
    mask_image = mask.reshape(h, w, 1) * color.reshape(1, 1, -1)
    ax.imshow(mask_image)

def show_points(coords, labels, ax, marker_size=375):
    pos_points = coords[labels==1]
    neg_points = coords[labels==0]
    ax.scatter(pos_points[:, 0], pos_points[:, 1], color='green', marker='*', s=marker_size, edgecolor='white', linewidth=1.25)
    ax.scatter(neg_points[:, 0], neg_points[:, 1], color='red', marker='*', s=marker_size, edgecolor='white', linewidth=1.25)

def show_box(box, ax):
    x0, y0 = box[0], box[1]
    w, h = box[2] - box[0], box[3] - box[1]
    ax.add_patch(plt.Rectangle((x0, y0), w, h, edgecolor='green', facecolor=(0,0,0,0), lw=2))
for i, (mask, score) in enumerate(zip(masks, scores)):
    plt.figure(figsize=(10,10))
    plt.imshow(image)
    show_mask(mask, plt.gca())
    show_points(input_point, input_label, plt.gca())
    plt.title(f"Mask {i+1}, Score: {score:.3f}", fontsize=18)
    plt.axis('off')
    plt.show()
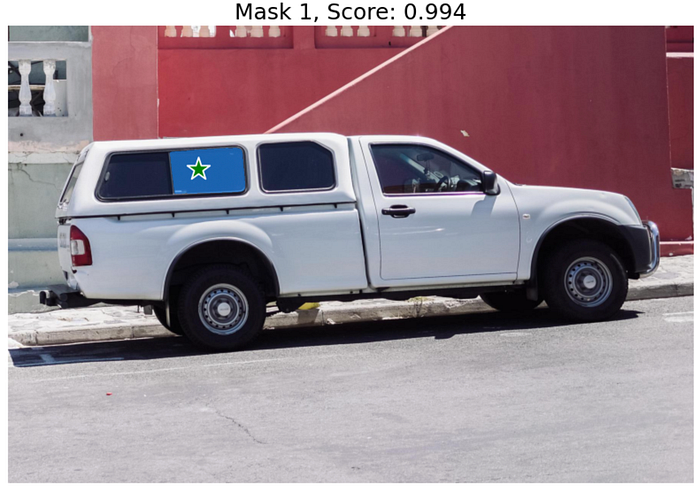
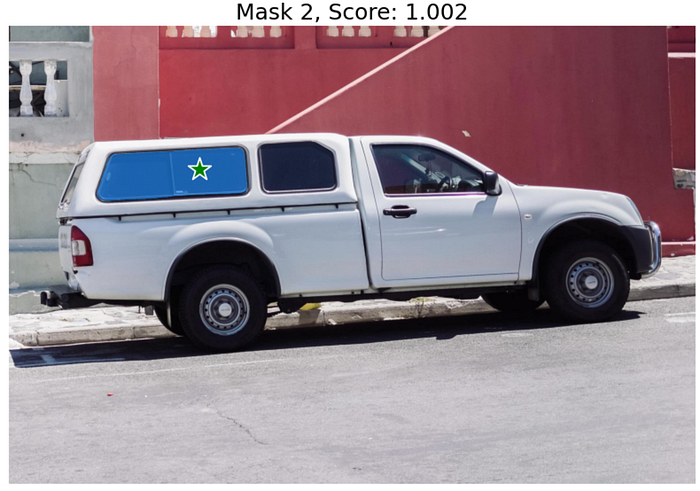
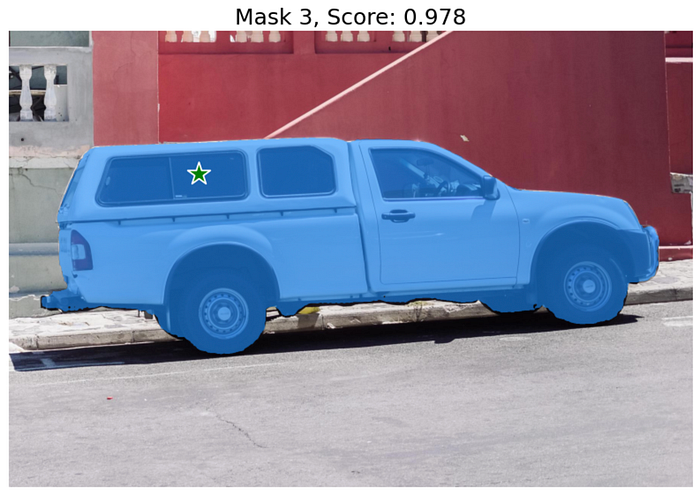
The code for the inference is written by the team of Segment Anything and can also be found here. https://github.com/facebookresearch/segment-anything/blob/main/notebooks/predictor_example.ipynb
I have only mentioned a small part of it as we are testing it's working on our GPU.
Conclusion :
- Segment Anything Model (SAM) can be best utilized when the segmentation results are assisted by human-level precise prompts.
- Colour and edges play an important role to define the level of ambiguity of an object and strongly influence the segmentation mask.
- SAM reminds me of Grabcut by OpenCV. I used Grabcut to build an image segmentation tool for an e-commerce company back in 2017.
Do share your experience with the SAM. I am definitely going to use this in my coming project assignments.
